Replace direction indicator relays in a Siemens BSI (Peugeot / Renault)
I have a Peugeot 206 and had a problem with the direction indicator lights.When I had been driving for a while, the indicator lights became 'sticky': they stopped blinking, and stayed on continuously.
When I knocked the BSI (below the fusebox) the lights went of again.
I found out that the relays in the BSI where broken.
Because the BSI is not a cheap part, I decided to replace the relays myself.
Since its not that easy to replace the relays, I made this page, just in case you have the same problem.
WARNING: The BSI is a central computer unit in your car. Without it your car will not start. Use this guide at your own risk.
Removal of the BSI from the car
- Remove the fuse box cover- Remove the protective cover from the underside of the fusebox
- Unscrew the BSI Torx screw (Torx20) and push the retaining clip at the lower part of the fusebox (see below)

- Now push the BSI down, and pull it towards you
- Flip the BSI upside down:

- Remove the Grey (GRIS), Blue (BLEU) and Yellow (JAUNE) connector:

- and the Black (NOIR) and Green (VERT) connector:
- Open the wire binder, and remove the wires from the binder
- You should now have the BSI:

Removal of the relays from the BSI
- Open the BSI by pushing all retaining clip on the sides and taking the two parts apart:
NOTE: To remove the PCB from the cover, all connectors on the PCB have to be desoldered.
Because this is a lot of work (if not impossible) you should try to avoid it (it's not needed;).
If you're not able to remove or place the relays, you can always cut a piece of plastic out of
the cover right above the relays.
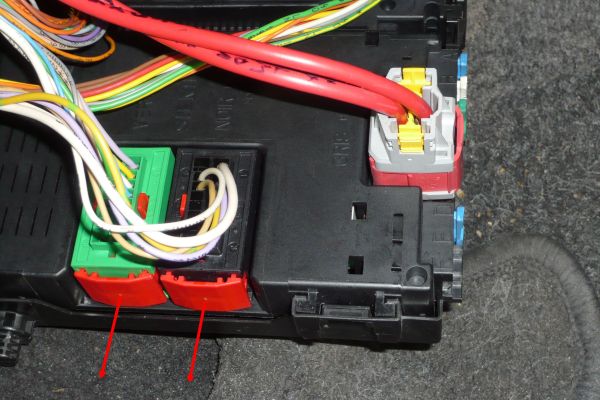
- Desolder the 5 leads of the two relays (you need the solder iron to be about 400°C)

- Pin 3 (indicated with green arrows) is probably the hardest pin to desolder. So desolder the other pins,
then heat pin 3 as long as needed to pull the relay from the board.
- You should now have the two relays removed from the PCB:

The new relay
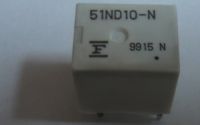
The relay is the FBR51ND10-N (51ND10-N) from Fujitsu (datasheet 1Mb)
In Europe it is available through Conrad Electronic, partnumber 505102-89. (Actually the FBR51ND12-W1)
If you can't find this relay in your country, you can also use the G8QN-1C4-DC12 from Omron as a replacement (datasheet 500kb).
This relay is amongst others available through Digi-Key, partnumber Z2696-ND.
(NOTE: I haven't tried this relay myself, I choosed it based on the datasheets. So use it at your own risk.)
Placing the new relays
OK, this is quite a fiddly work, since you can't just put the relay on the PCB from the top, because of the cover.But I managed to do it, you just need some patience.
As I said before, if it doesn't work for you, just cut a piece from the cover.
OK, now the relays are placed, you can place the BSI back in your car.
Just do the reverse of removing the BSI.
Now the problems with your direction indicators should be solved. (at least it worked for me;)